고정 헤더 영역
상세 컨텐츠
본문
728x90
반응형
결과물
click motion을 만들었다.
구현 과정
Vue 프로젝트 구조는 아래와 같다.
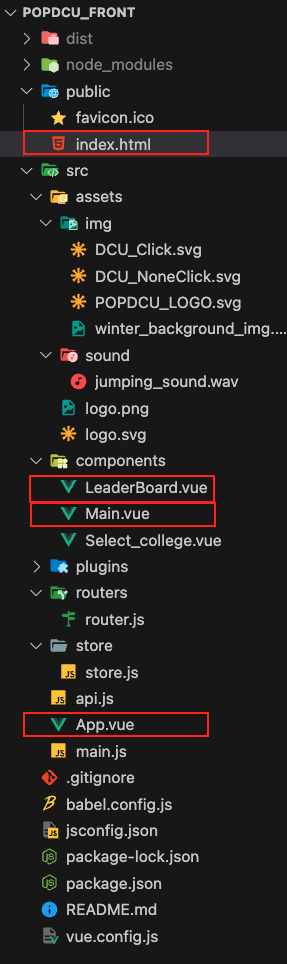
구조가 이렇게 돼 있을 때
동영상의 화면을 뛰우기 위해서
index.html ==> App.vue ==> Main.vue
의 순서로 각 컴포넌트들을 불러오게 된다.
여기서 화면에 보이는 로고, 캐릭터 이미지, 카운팅 횟수 들과 같은 객체들은 Main.vue에서 관리된다.
그다음 App.vue에서는 Main.vue 컴포넌트와 하단에 보이는 작은 보라색 버튼인 LeaderBoard.vue 컴포넌트를 가지고 있다.
- index.html
- App.vue
- router
- Main.vue
- 로고
- 캐릭터 이미지
- 카운팅 횟수 출력
- Select_college.vue
- Main.vue
- LeaderBoard.vue
- 리더보드 창(구현예정)
- router
- App.vue
이런 느낌이다.
입력 인식
POPDCU의 기본적인 컨셉은 마우스 클릭, 키보드 입력, 핸드폰 터치로 카운팅 해주는 거다.
이 기능을 만들기 위해 키보드 입력과 같은 인식을 원래는 App.vue에서 해줬었다. 그런데 단과대학 선택을 위한 컴포넌트인 select_college를 만들고 나니 이것도 App.vue의 자식 컴포넌트다 보니 여기서 입력되는 것들도 카운팅이 됐다. 그래서 입력 인식은 Main.vue 컴포넌트에서 해주게 되었다.
입력 처리
입력 처리는 Vuex를 사용했다. Store.js에서 처리하게 되는데, mutations로 각각의 입력 감지한 결과를 넘겨받고, action카운팅 여부를 확인한다. 코드는 아래와 같다.
store/store.js
import Vuex from 'vuex';

export default new Vuex.Store({
  state: {
    clickedOrKeyedCount: JSON.parse(localStorage.getItem('clickedOrKeyedCount')) || 0,
    mouseClicked: false,
    keyPressed: false,
  },
  mutations: {
    setMouseClicked(state, value) {
      state.mouseClicked = value;
    },
    setKeyPressed(state, value) {
      state.keyPressed = value;
    },
    incrementClickedOrKeyedCount(state) {
      state.clickedOrKeyedCount++;
      localStorage.setItem('clickedOrKeyedCount', state.clickedOrKeyedCount);
    },
  },
  actions: {
    updateClickedOrKeyedCount({ commit, state }) {
      if (state.mouseClicked || state.keyPressed) {
        commit('incrementClickedOrKeyedCount');
        if (state.mouseClicked && state.keyPressed) {
            state.mouseClicked = false;
            state.keyPressed = false;
        }
      }
    },
  },
});
action에서 보면 &&처리된 구문이 있는데 이 경우는 키보드가 눌리고 있으면서 마우스 클릭이 인식될 경우 카운팅이 2씩 올라가는데 이런 경우를 제외시키기 위해서 설정했다.
카운팅을 브라우저에서 저장하기 위해 localStorage를 사용했다.
Vuex는 localStorage로 저장하기 전에 구현해 봤는데, 어차피 localStorage로 카운팅 값을 전역에서 사용할 수 있다면 Vuex를 사용하지 않아도 됐을 것 같다.
지금까지의 내용
https://github.com/POPDCU/POPDCU_Front/pull/7
API
POPDCU백엔드는 Spring boot로 구현됐다. (다른 친구가 구현해서 잘 모름)
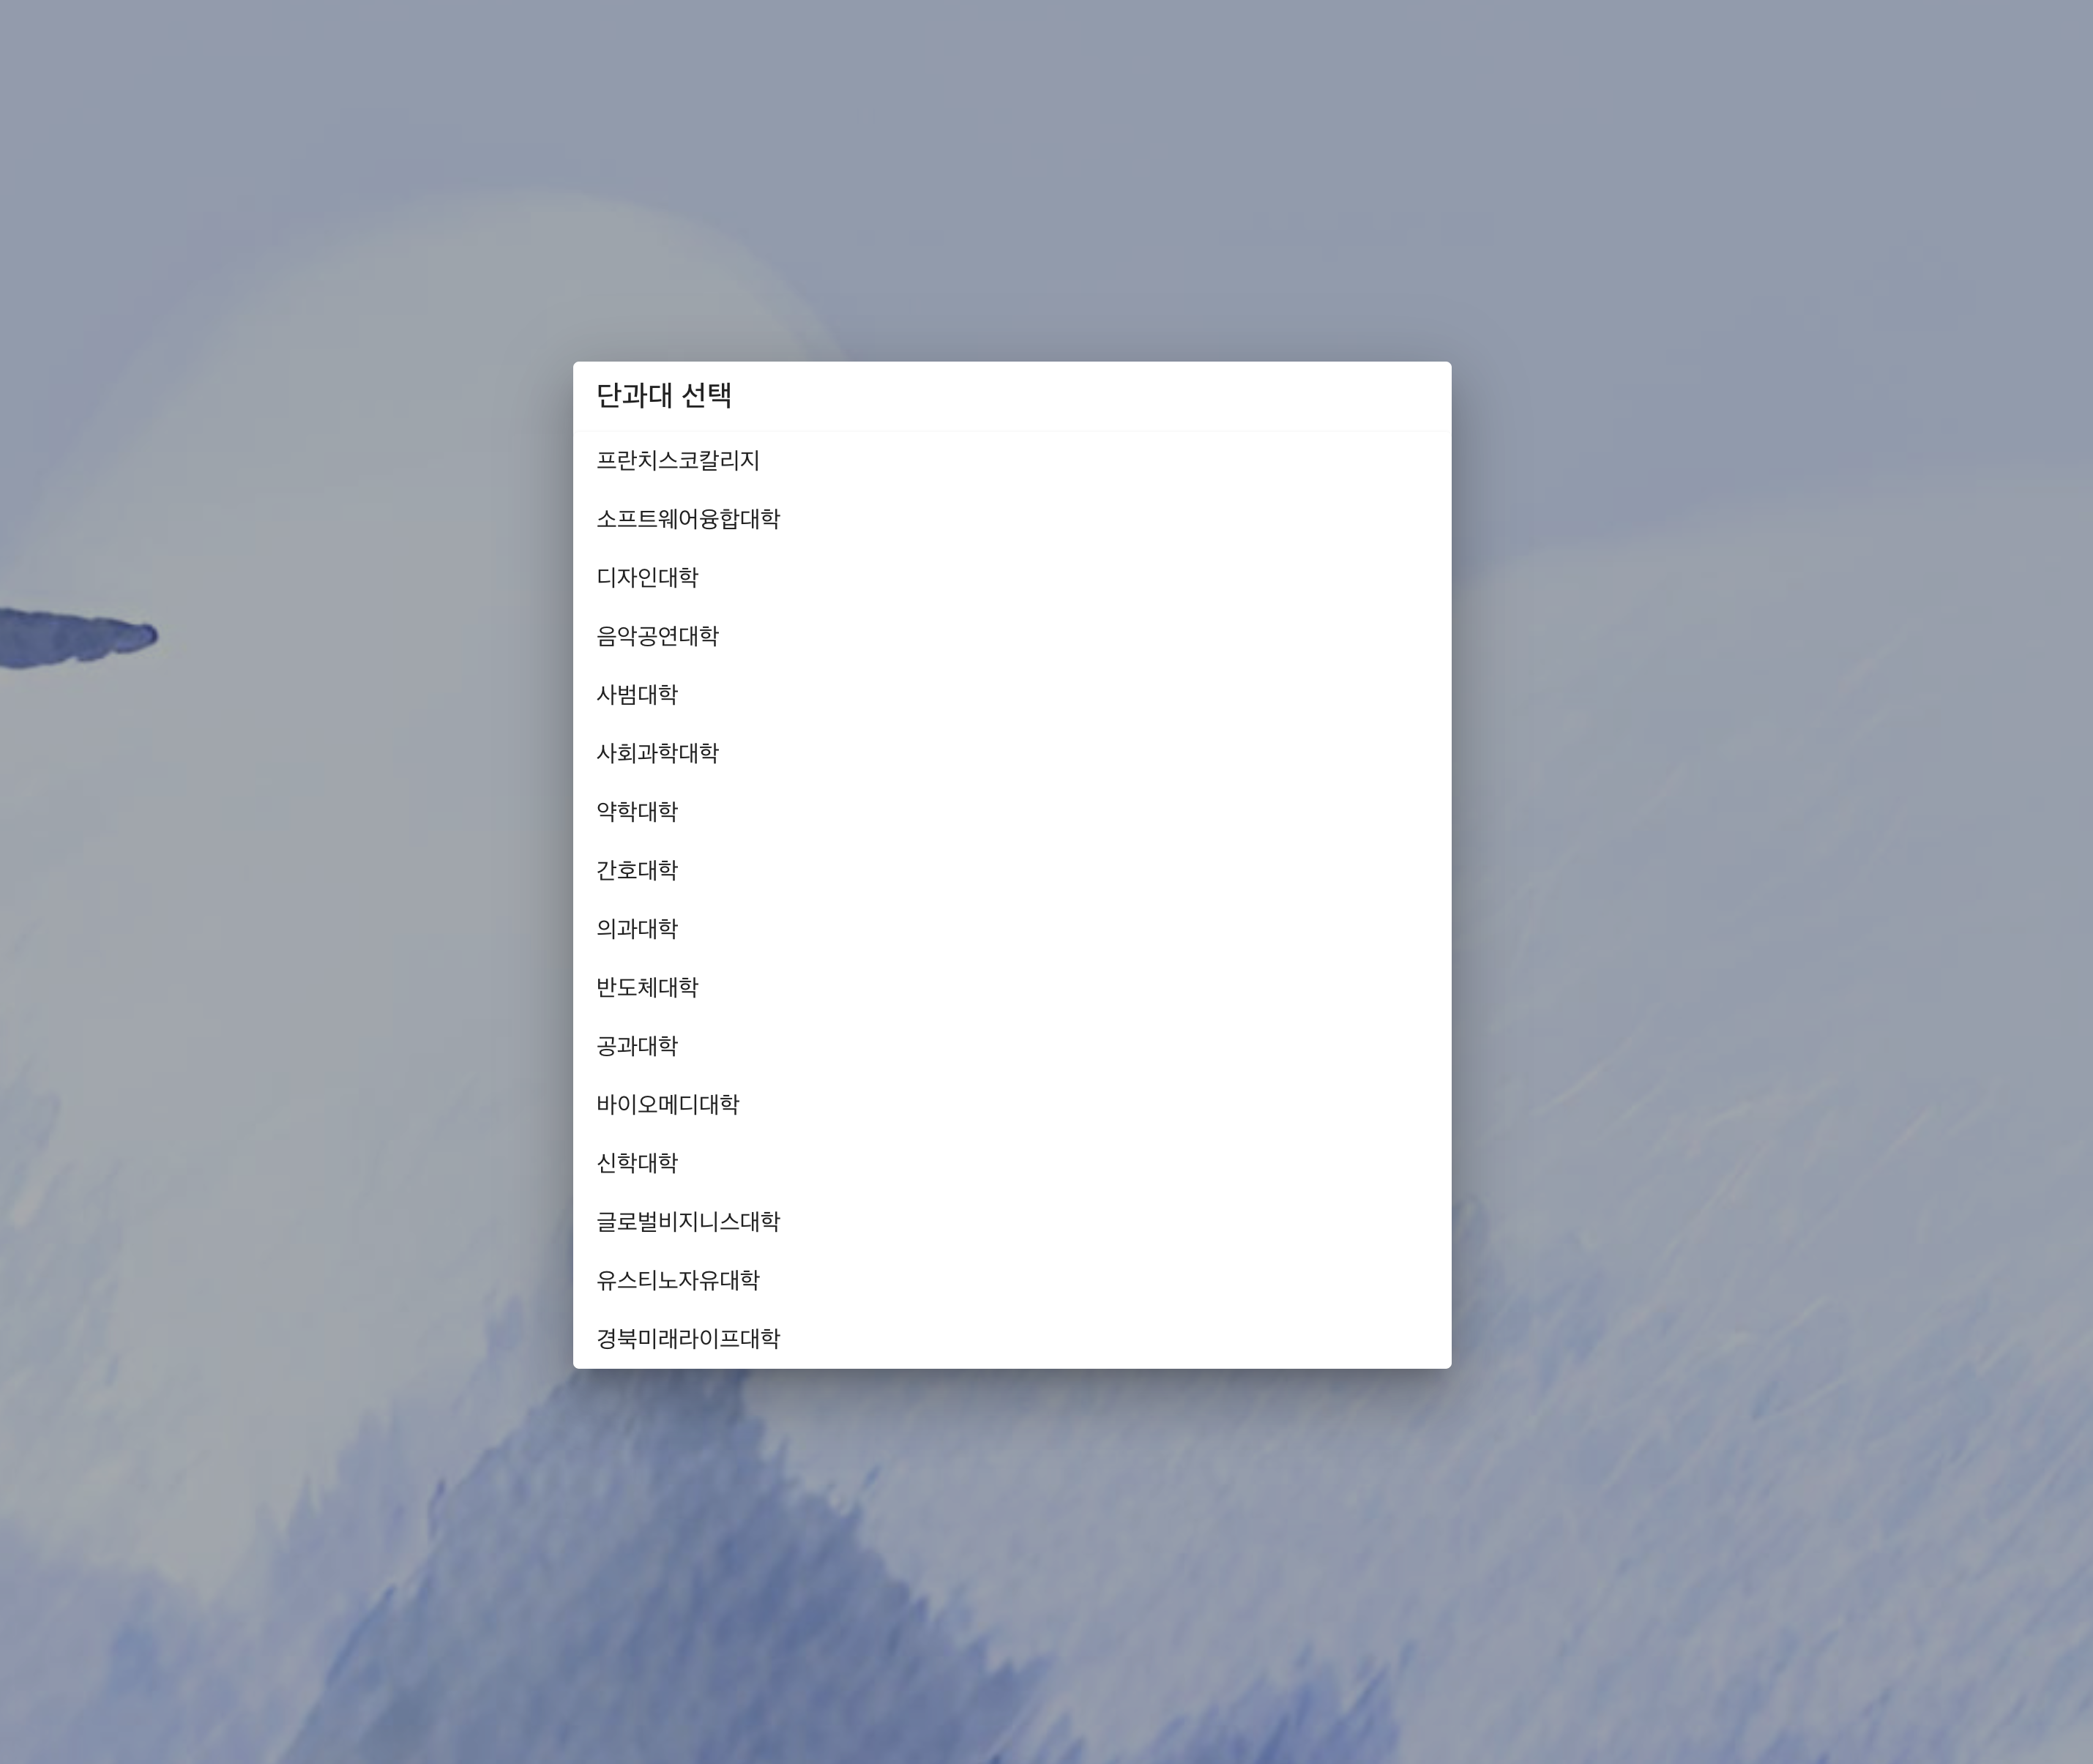
처음으로 Back, Front분리 개발을 해 보는데 일단 get을 통해 CollegeList를 가져와 봤다.
/api.js
import axios from 'axios';

const apiUrl = 'https://port-0-popdcu-back-test-3yl7k2blopd9kw1.sel5.cloudtype.app/api';

export const getCollegeList = async () => {
  try {
    const response = await axios.get(`${apiUrl}/ranking`);
    return response.data;
  } catch (error) {
    console.error('Error fetching ranking data:', error);
    throw error; // 에러를 상위 컴포넌트로 전파
  }
};
axios를 사용해서 해당 url에 있는 json데이터를 가져왔다.
대충 이런 식으로 생겼다.
[{"collegeName":"프란치스코칼리지","countNumber":140},{"collegeName":"소프트웨어융합대학","countNumber":30},{"collegeName":"디자인대학","countNumber":0},{"collegeName":"음악공연대학","countNumber":0},{"collegeName":"사범대학","countNumber":0},{"collegeName":"사회과학대학","countNumber":0},{"collegeName":"약학대학","countNumber":0},{"collegeName":"간호대학","countNumber":0},{"collegeName":"의과대학","countNumber":0},{"collegeName":"반도체대학","countNumber":0},{"collegeName":"공과대학","countNumber":0},{"collegeName":"바이오메디대학","countNumber":0},{"collegeName":"신학대학","countNumber":0},{"collegeName":"글로벌비지니스대학","countNumber":0},{"collegeName":"유스티노자유대학","countNumber":0},{"collegeName":"경북미래라이프대학","countNumber":0}]
처음에 데이터 가져오는 걸 시도해 보니
Access to XMLHttpRequest at 'https://port-0-popdcu-back-test-3yl7k2blopd9kw1.sel5.cloudtype.app/api/ranking' from origin 'http://localhost:8080' has been blocked by CORS policy: No 'Access-Control-Allow-Origin' header is present on the requested resource.
이런 오류가 떴다.
cors정책으로 가져올 수 없다는 내용이었다.
이후에 친구한테 말하니 금방 해결됐다. 아마 host를 전체로 설정한 것 같다.
잘 나오는 것을 확인했다.
아 그리고 여기서 로딩을 이미지를 처음 구현해 봤다.
    async fetchCollegeData() {
      try {
        this.isLoading = true;
        this.collegeList = await getCollegeList();
        this.collegeNames = this.collegeList.map(college => college.collegeName);
        this.isLoading = false;
        console.log(this.collegeList);
      } catch (error) {
        console.log('Error in component:', error);
      }
    },
이게 api.js의 코드를 실행시키는 코드다. 가져오기 전에는 isLoading을 true로, 가져온 후에는 false값을 바꿔 준다.
      <div v-if="isLoading" class="loading-overlay">
        <v-progress-circular
        :size="50"
        color="primary"
        indeterminate
      ></v-progress-circular>
      </div>
      <div v-else>
        <v-card class="mx-auto">
          <v-list-item v-for="(college, index) in collegeNames" :key="index" @click="handleSelection(college)">
            <v-list-item-content>
              <v-list-item-title>{{ college }}</v-list-item-title>
            </v-list-item-content>
          </v-list-item>
        </v-card>
      </div>
그리고 이렇게 해 주면 Loading을 구현? 할 수 있다.
개발 단계에서 backend서버를 간단하게 배포하기 위해서 우리는 Cloud type이라는 서비스를 사용했다.
github 저장소와 연결만 시켜주면 간단하게 배포를 할 수 있어서 api테스트 배포용으로 아주 좋은 서비스 같다.
https://github.com/POPDCU/POPDCU_Front/pull/11
다음에 할 거
POPCAT을 해보면 클릭할 때마다 소리가 난다. 나도 이거 똑같이 구현해 보려고 했는데 이게 생각보다 잘 안된다.
아마 음악을 불러오는 게 비동기로 작동하는데, 클릭이 빠르게 되다 보니 파일을 제대로 못 가져오는 게 아닌가 하는 생각이 든다. 다음에 요거를 해결해 보겠다.
728x90
반응형
'POPDCU' 카테고리의 다른 글
| 01. 다시 시작하는 웹 개발 (Front개발을 해보자) (0) | 2023.11.04 |
|---|